Showing posts with label Craft Hacks. Show all posts

Wednesday, 8 April 2009

How-to: Decoupage Wallpaper Canvas Hack


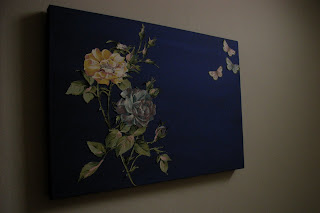
High time for a hack I feel: this time, a simple affair featuring a rather crumpled offcut of some Laura Ashley wallpaper, some snazzy blue paint and a canvas with some previously rather shite artwork emblazoned on it. 


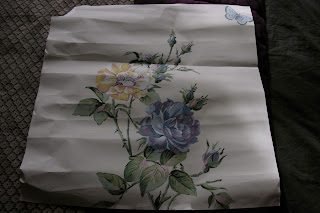
Said canvas had been hanging on my bathroom wall since a previous housemate created it prior to my tenancy, and for some time I've been meaning to do something more exciting with it. Cue a bin rummage at the end of a recent magazine shoot where I salvaged this piece of vintage-tastic Memento wallpaper. Far too pretty to use as just wrapping paper, yet too crumpled to use in its entirety, I decided to liberate the print from its plain cream background. Several hours of cutting and scalpel-ing later, my pattern was freed. I decided to go for a contrasting colour on my canvas so painted over the old artwork in this gorgeous cobalt blue, which really picks out the blue/grey tones of my bathroom wall. I then simply arranged my rose on the canvas and stuck it down with some UHU adhesive, along with a few butterflies also on the original wallpaper. Et Voila!

Simple yet effective I feel. I had intended to go over the slightly dodgy sticky-up corners with more glue but actually liked the extra texture they gave to the piece (plus had already tidied everything away) so decided to keep them as a deliberate feature. 

Stay tuned for more exciting wallpaper-offcut hacks - with the bank holiday almost upon us, a little DIY action seems as inevitable as stuffing my face with cream eggs to the point of feeling sick.

Friday, 27 March 2009

I'm a Queen (of Vintage (on the new Queens of Vintage website))!


Have been a little absent of late (did you miss me?) as I've been kept very busy with the dayjob (style assisting on a catalogue shoot this time) plus working on....

Make Do and Mend a Vintage Scarf, by Joanna Thornhill, at www.queensofvintage.com

This! This dramatic build-up is due to the fact that not only have I crafted this cushion cover from a vintage scarf with my own fair hands, but it also forms my editorial debut on the fabulous Queens of Vintage website, on which I am now going to be a contributing writer on all things interior and make-do-and-mend related. Tres excitement!

Click here to see my first post, detailing how I turned this 25p charity shop headscarf into a gloriously kitsch cushion cover, complete with decorative Oxford trim. I would re-post it here, but apparently Google gets cross if you do that - luckily the website is full of lots of other exciting posts too so it's well worth the visit. Enjoy!

Tuesday, 3 March 2009

Tin Can Pendant Light

I keep getting told off by the boyf for my inability to throw away empty jars/tins/milk bottles and other items usually befitting the recycling bag "in case they come in useful for something". It seems, however, I'm not the only one, judging by my recent scouring of the design blogs. Dutch blogger Danielle de Lange over at Style-Files highlighted a very craft hack-ey use of tin cans as light fittings (see picture below). Taken originally from (also Dutch) magazine website 101 Woonideeen, the feature includes make-your-own instructions in, yes, you've guessed it, Dutch. Helpfully, Danielle notes the following in English: "To make the lights you need clean empty tins with a printed label (so no paper label) and a fitting with cable and a plug. Create (with a drill) an opening for the fitting through the top of the tin and pull the fitting through this opening. Then you only need to put a bulb into the fitting and your lamp is ready to shine!"
These would look adorable strung several in a row as low pendants over a kitchen breakfast bar (and would also be very appropriate for the setting) as well as gathered like this. I'd be tempted to have a go at spraypainting tin cans in some cheery pastels and even punching some decorative holes in them for an alternative to a printed can.

Thanks to www.style-files.com for flagging this up!

Wednesday, 18 February 2009

Headboard Hack

I think it's high time I posted a how-to hack! In an attempt to avoid the temptation of the January sales, I decided to distract myself from sales temptations by implementing a headboard makeover (thus spending the best part of a week covered in paint and thread and therefore barely presentable in my own living room, let alone retail outlets). But I digress.


Before I began, I was left with this:


The previous tenant in my rented room was also a keen interiors-er and had constructed this rather snazzy creation out of some good ol' MDF and an assortment of supportive struts - it houses all my art and craft supplies in pull-out trolleys and even has a section for my boyfriend's clothing (I, of course, have two full wardrobes elsewhere in the room whilst the long-suffering chap has been relegated to a tucked-away rail up top). But the colour wasn't really doing it for me and I longed for a comfy back to rest up against. Plus I'd just inherited some fabulous curtains (a leftover make from a photoshoot) I subsequently customised with slick, chunky black ribbon along the vertical edges, which I was keen to refer to visually elsewhere in the room to help tie the look together.


So I did this:


It's not quite pink enough to upset the boyf but is such a glorious shade it's all I can do to keep from licking it to see if it tastes as good as it looks (I used Designer's Guild Mulberry). By painting the routed lines black, rather than keeping them the same colour, the whole structure really seems to come to life and all its handcrafted joints are lovingly highlighted, plus it echoes the lines of said fab curtains.


For those reading who don't happen to be renting a room from a former interior designer who kindly left handmade MDF structures upon his departure, however, here's a couple of ideas that could be adapted to work in any space:


1. Feature wallpaper stripe.


A quick and easy way to get a shot of colour and pattern into any space. I used some leftovers of this flock-tastic wallpaper from Colefax and Fowler and simply stuck it straight onto the headboard unit using double-sided tape, taking care to pattern-match all five sections required to fill the line. Easy peasy. You could use this method to add a stripe in an alcove, or even stick some to a piece of wood to make bespoke artwork. Still not loving my inherited light fitting but until I'm struck with an ingenious idea for customising that too it'll stay as is.


2. Padded headboard


Another bargain hack (not that I ever do expensive ones, but even still) - through using fabric and upholstery nail strips already in my collection, my only expense was getting a piece of foam cut (which cost around £10 from Pentonville Rubber), which I measured to fill the width of my bedframe and end just shy of the inverted shelf on the headboard unit. I then attached some raspberry silk around the whole foam piece, holding it in place with pins poked through both the foam and fabric.

Then for my feature fabric - a vintage piece of sari fabric I used as a net curtain in a previous flat. After pinning this taut at the back I stitched it straight at the front to hold it in place, before adding my somewhat triumphant finishing touch - upholsterer's nail strip, usually used to trim solid furniture, which I salvaged from a bin (OK, it was a bin at a photoshoot as these were the leftovers from some "proper" upholstering - but a crafty find nonetheless). As luck would have it, by splicing all the leftover bits together I had just enough to cover both sides and it really pulled the whole look together. A simple bit of stitchwork was enough to hold this in place.

And as with the wallpaper, the whole thing is (miraculously, somehow) held in place with some trusty double-sided tape - again, this should also work sticking/leaning the foam directly to a wall, or onto a simple sheet of wood for extra support.


I now sleep far more sweetly basking in the glory of my hack - it also proves to be a much comfier vantage point from which to dream up the multitude of further hacks I have earmarked for the space. I'm getting twitchy fingers just thinking about it...
Sunday, 14 September 2008

Let's get things started...

I'm going to try and add a few images and links to get things on the road... have no idea how to do this so let's see if I can figure it out...

Anyhoo, I thought I'd begin with a few pictures from my own archives to illustrate some of my own Craft Hacks. As London Design Week 2008 is getting ready to open its doors to a myriad of new design talent, I'm planning to get some images and reviews up here on my favourites, so seems best to add my efforts in now before I'm completely upstaged...


1. Lampshade Jumper : A friend passed on this rather lovely crochet top to me, but it somehow always made me feel a bit 'bulky', and as such spent much of its life languishing at the back of the wardrobe. One evening I was gazing up with annoyance at my previous lampshade, which served no function other than to obscure most of the light in my already rather gloomy bedroom, when inspiration struck. By using the existing framework from my old lampshade, I hand-stitched the top (pre-cut to below the sleeve) to the upper frame, and allowed the original bottom trim of the jumper to form a rather sweet fringing around the bottom framework (also hand-stitched in place). The result is an original lightshade, me no longer leaving the house with blotchy blusher as I can actually see to apply make-up now, and I even have enough remnants left over for a follow-on project. Hurrah!

2. Oriental Fishtank : When Ben, our antipodean housemate, arrived home with a donated tropical aquarium, much excitement was felt around the homestead. However, excitement soon turned into abject distress when I realised that said aquarium was fully integrated into a black ash-effect melamine base unit. A quick rummage through my ever-increasing collection of unused wallpaper samples, however, turned up this little trump card - a stunning, subtle oriental design picked up in trusty B&Q. By simply taking off the door handles, cutting the paper to size and sticking it down with some double-sided tape, the 1980's throwback is transformed into a bijou little home for our aquatic friends.

3. Quaker Oats Tin : A little example of some upcycling - one of my favourite terms and something we should all aspire to do a little more of - in essence, taking something that is disposable and transforming it into something of greater use and value. This mini-project is a fairly simple interpretation of it, inspired by the wonderful tropical gardens seen on a visit to the Eden Project in Cornwall. I love the idea of repurposing items and using them outside of their original intended use. What else could you use as an indoor planter - an old teapot? A milk bottle? Old bean tins, spraypainted or decorated with some fabric offcuts?