

Interior Craft 2.0: fresh from the underbelly of London Town...


 2. Decoupage 'This Is Manchester' stool - not sure the origins of this piece, though it looks like newspaper photocopies decoupaged over a re-hacked stool, finished in a high gloss varnish. Keeping the colour palette monochrome enhances the classy finish.
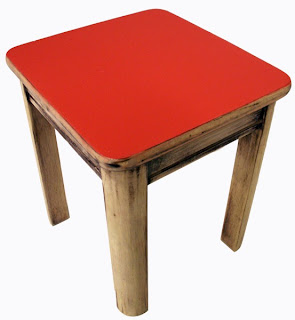
 3. Red-top stool - great juxtaposition of wooden vintage legs with what looks like a slick formica top - would be a practical choice for a kitchen table hack, too.
 4. Stripy Collection - fantastic way to use up leftover paint. A good have-a-go hack - choose a selection of colours to match your interior scheme, and keep the lines handpaintedly jaunty.
 5. Wooden chair with customised back: by removing the edge back spindles, a standard design somehow looks somewhere between cutting edge and Art Deco.
Upcycled original pieces diverted from landfill to become functional eye candy - Jamie, Craft Hacker salutes you.
Images and information all courtesy of www.jamiewardfurniture.tk
Before I began, I was left with this:
The previous tenant in my rented room was also a keen interiors-er and had constructed this rather snazzy creation out of some good ol' MDF and an assortment of supportive struts - it houses all my art and craft supplies in pull-out trolleys and even has a section for my boyfriend's clothing (I, of course, have two full wardrobes elsewhere in the room whilst the long-suffering chap has been relegated to a tucked-away rail up top). But the colour wasn't really doing it for me and I longed for a comfy back to rest up against. Plus I'd just inherited some fabulous curtains (a leftover make from a photoshoot) I subsequently customised with slick, chunky black ribbon along the vertical edges, which I was keen to refer to visually elsewhere in the room to help tie the look together.
So I did this:
It's not quite pink enough to upset the boyf but is such a glorious shade it's all I can do to keep from licking it to see if it tastes as good as it looks (I used Designer's Guild Mulberry). By painting the routed lines black, rather than keeping them the same colour, the whole structure really seems to come to life and all its handcrafted joints are lovingly highlighted, plus it echoes the lines of said fab curtains.
For those reading who don't happen to be renting a room from a former interior designer who kindly left handmade MDF structures upon his departure, however, here's a couple of ideas that could be adapted to work in any space:
1. Feature wallpaper stripe.
A quick and easy way to get a shot of colour and pattern into any space. I used some leftovers of this flock-tastic wallpaper from Colefax and Fowler and simply stuck it straight onto the headboard unit using double-sided tape, taking care to pattern-match all five sections required to fill the line. Easy peasy. You could use this method to add a stripe in an alcove, or even stick some to a piece of wood to make bespoke artwork. Still not loving my inherited light fitting but until I'm struck with an ingenious idea for customising that too it'll stay as is.
2. Padded headboard
Another bargain hack (not that I ever do expensive ones, but even still) - through using fabric and upholstery nail strips already in my collection, my only expense was getting a piece of foam cut (which cost around £10 from Pentonville Rubber), which I measured to fill the width of my bedframe and end just shy of the inverted shelf on the headboard unit. I then attached some raspberry silk around the whole foam piece, holding it in place with pins poked through both the foam and fabric.
Then for my feature fabric - a vintage piece of sari fabric I used as a net curtain in a previous flat. After pinning this taut at the back I stitched it straight at the front to hold it in place, before adding my somewhat triumphant finishing touch - upholsterer's nail strip, usually used to trim solid furniture, which I salvaged from a bin (OK, it was a bin at a photoshoot as these were the leftovers from some "proper" upholstering - but a crafty find nonetheless). As luck would have it, by splicing all the leftover bits together I had just enough to cover both sides and it really pulled the whole look together. A simple bit of stitchwork was enough to hold this in place.
And as with the wallpaper, the whole thing is (miraculously, somehow) held in place with some trusty double-sided tape - again, this should also work sticking/leaning the foam directly to a wall, or onto a simple sheet of wood for extra support.
I now sleep far more sweetly basking in the glory of my hack - it also proves to be a much comfier vantage point from which to dream up the multitude of further hacks I have earmarked for the space. I'm getting twitchy fingers just thinking about it...
I'll be posting a few hacks I've been working on very soon, with some step-by-step instructions, but for now feast your craft-starved eyes on the work of hugely talented duo Di Overton and Harvey Roll over at Ghost Furniture (tagline: "Bringing quality furniture back from the dead and making it hauntingly beautiful.") Whilst I love my 'day job' as an interior stylist, their existence does sound somewhat idyllic - scouring the land for overlooked vintage treasure ripe for their very innovative, often humorous brand of makeover, all created from the belly of their Northumberland workshop. Pieces range from the almost sculptural, such as the Dinner for One table, to more functional objects like the Flapper chair (so-called due to its fabric applique detail, taken from a piece of 1920's loungewear.)
One of my favourite elements of the company is the great detail they go into to describe where each piece originated and how it was created - a complete polar opposite of mass production. Casting my eyes over this sublime collection has certainly inspired me to get working on a coffee table makeover project I've been mulling over for a while now. How about you?
